React image handling libraries for lighter upload flows
React image handling libraries help teams add previews, cropping, and compression in the browser so users upload faster and servers do less work.
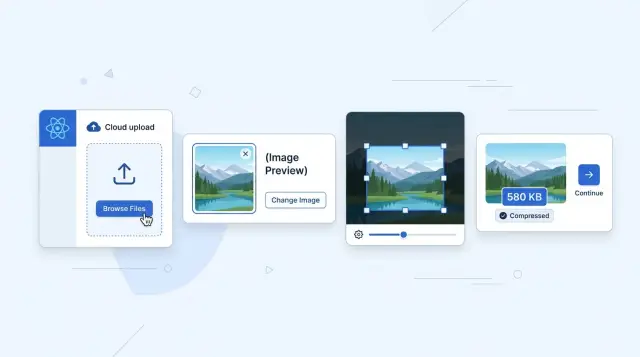
Table of Contents
Why image uploads feel slow and messy
A modern phone photo is often much bigger than a simple form needs. One image can easily be 8 MB, 12 MB, or more before your app touches it. Even on fast Wi-Fi, that feels clunky. On mobile data, it can feel broken.
People also want to see the photo before they send it. If the app shows no preview, they pause. Did they pick the right file? Did the image rotate sideways? Will it crop badly inside a square avatar? That small bit of doubt slows the whole form down.
Server-first image handling makes all of this worse. When the app uploads the original file and waits for the backend to resize or compress it, the user sits through extra delay. The server also takes on more work, stores larger files, and needs to deal with more failure cases. A basic profile photo suddenly turns into upload limits, timeouts, and cleanup jobs.
The small annoyances add up fast. A progress bar stalls at 90%. An error appears after a long wait. The user retries the same image because the app never explained what went wrong. Some people give up. Others leave the form, take a screenshot to make the image smaller, and come back annoyed.
That is why image uploads feel messy even when the rest of the app feels solid. The friction usually starts before the file reaches your server. When previews, cropping, and compression happen in the browser, the form feels lighter. That is where React image handling libraries help most: they cut wait time, reduce backend work, and give users a clearer sense of control.
What to compare before picking a library
Most teams do not need the biggest package with the longest feature list. They need a library that makes image uploads feel quick, clear, and hard to mess up.
A simple way to judge any library is to walk through the whole flow from file selection to final upload. If one step feels awkward, users will feel it too.
Look at four things. First, the file input: drag and drop, mobile camera input, accepted file types, and file size or file count limits. A profile photo flow needs different rules than a gallery upload. Next, the editing controls. Check how cropping feels, how smooth the zoom is, whether rotation is available, and whether touch input works well on a phone. Then look at the output. You may need JPEG, PNG, or WebP, along with quality settings, resized dimensions, and correct EXIF orientation so images do not turn sideways. Last, check project fit. Read the docs, scan recent releases, and see how TypeScript support feels in a real component. Thin docs can turn a one-hour task into half a day.
The small details matter. Some packages have a nice crop UI but leave rotation or EXIF fixes up to you. Others compress well but offer weak preview support, so you end up pulling in a second tool.
Mobile behavior deserves extra attention. Camera input can break the smoothest desktop demo, and touch controls get frustrating fast. If most of your users upload from phones, test that first.
Also look at how much code you need around the library. A package that saves 150 KB in image size but adds a pile of setup and edge cases may not save time overall.
The best choice usually feels boring in a good way. It accepts the file, shows the preview, lets the user adjust it, and gives you a clean final result without extra server work.
Libraries for file picking and previews
For most teams, react-dropzone is the easiest place to start. It handles drag and drop, click to select, and basic file rules without forcing you to build the whole picker yourself. It stays popular because it solves the dull but necessary parts well.
You can limit file types, reject files that are too large, and show feedback before upload starts. That matters more than people expect. If someone drops a 20 MB TIFF when your app only accepts JPG or PNG, the app should say so right away.
A good picker should do a few basic jobs well: accept only the image types you support, block oversized files, show a preview immediately, let people replace or remove the file, and explain errors in plain language.
Object URLs or FileReader
For instant previews, object URLs are usually the better default. They are simple, fast, and work well when you just need to show the selected image in an img tag. The flow is small: create a URL from the File, render it, and clean it up when the file changes or the component unmounts.
FileReader still helps when you need a data URL, but it uses more memory. For one avatar image, that may not matter. For several large photos, it often does.
Cleanup is easy to miss. If a user picks one photo and then replaces it five times, old preview URLs can stay in memory unless you revoke them. In React, call URL.revokeObjectURL on the old preview when you replace the file, and do the same in a cleanup function.
Memory use gets worse when people add many large images at once. A gallery form with ten phone photos can make the page feel heavy before any upload begins. In that case, cap the number of files, keep previews small, and avoid storing the original file and several preview versions in state at the same time.
For a profile photo flow, react-dropzone plus object URL previews is usually enough. It feels fast, keeps the code small, and leaves cropping or compression for the next step.
Libraries for cropping
Cropping changes how an upload feels. A good crop tool gives people control in a few seconds. A bad one turns a profile photo update into a chore.
For most apps, react-easy-crop is the first package to try. It feels smooth on desktop and mobile, and the zoom control is easy to understand. If users need to move the image, zoom in, and pick the exact frame, this package usually stays out of the way.
react-image-crop fits a different job. It gives you a clean rectangle crop UI without much setup or visual noise. If your team wants a lighter cropper and does not need fancy interactions, it is often enough.
react-avatar-editor works best when the flow is clearly about profile photos. It handles the actions people expect for avatars: drag, zoom, and rotation. That rotation control matters more than it seems. A slightly tilted phone photo can make the whole result feel off.
Picking the right crop tool
Choose the tool that matches the job. Use react-easy-crop when you need smooth zoom and touch-friendly controls. Use react-image-crop when a plain rectangle selector does the job. Use react-avatar-editor when the upload is almost always an avatar.
The crop UI is only half the work. After the user confirms the crop, export the result through canvas before upload. That turns the selected area into a real image file instead of sending the original file with crop coordinates.
Canvas export is also a good place to resize the image, change the output format, or lower quality a bit before upload. A 6 MB phone photo can easily become a clean square avatar under 300 KB with no visible loss for most users.
If your app has one common path, keep it simple. Let the user pick a photo, crop it once, preview the result, and upload the canvas output. That flow is easier to test and much easier to explain.
Libraries for compression and resizing
Phone photos are often far larger than your upload flow needs. A selfie can start at 8 to 12 MB even when the app only shows a small circular avatar. If you shrink the file in the browser first, uploads finish faster and the server has less cleanup to do.
In this part of the flow, the most useful tools are often small browser helpers rather than React-only packages. They fit neatly into a React app because they run after file selection and before upload.
browser-image-compression is a practical first pick. It works well when you want one thing: reduce file size in the browser with very little setup. You can set limits such as maximum file size or maximum width and then send the smaller file to your API.
Compressor.js gives you more control. It helps when you want to choose output quality, resizing rules, or even change format for certain uploads. That extra control is useful if the product team cares about exact file limits or wants images to keep a certain look.
If resize quality matters, pica is worth testing. A quick canvas resize can make images look soft, especially avatars or product photos with fine edges. pica usually gives cleaner results when you scale large images down.
Do not guess with a vague quality setting and hope for the best. Set a target instead. Cap the longest side, for example 1200px for general photos. Aim for a sensible file size range, such as 200 to 400 KB for avatars. Keep the original only when people truly need full resolution. Then test with bright photos, dark photos, and screenshots, because each one compresses differently.
A simple example makes the point. A user picks a 9 MB profile photo from an iPhone. Your app crops it, resizes it to 800px, and compresses it to about 250 KB before upload. The preview still looks sharp, the upload finishes much faster, and the server avoids shrinking a file that never needed to be huge.
If you only choose one compression library, browser-image-compression is a good starting point. If you need tighter control, use Compressor.js. If resized images still look rough, add pica for that step.
A simple stack for most React apps
Most teams do not need a big image pipeline on day one. A small stack with react-dropzone, react-easy-crop, and browser-image-compression covers the common path: pick a file, let the user fix it, shrink it in the browser, then upload one finished image.
The order matters. If you compress before the user crops, you may waste time shrinking pixels they will throw away. If you upload the original and process it later, the app feels slower and the server does extra work for no good reason. The cleaner flow is select, adjust, upload.
This stack works because each library does one job well. You are not fighting a giant package that tries to control the whole upload experience.
State handling matters more than people expect. Keep only small preview data in React state, like the object URL, crop values, zoom level, and upload status. Try to keep the large File or Blob out of frequent rerenders. A ref or a local variable inside the upload step is often enough. That small choice can make the UI feel much less jumpy on slower laptops and phones.
For most apps, the best result is not more features. It is fewer steps. A user picks an image, makes one quick adjustment, and waits for one upload instead of three hidden ones.
If you are building a settings page or a simple content form, this stack is usually enough. The server receives one final file that is already cropped and compressed, stores it, and moves on. That keeps the backend simpler and makes the upload flow easier to trust.
How to build the flow step by step
A smooth upload flow does less work than many teams expect. You do not need a big server pipeline for basic profile photos, cover images, or product thumbnails.
Most image libraries fit into the same sequence:
- Accept one file and validate the type right away. Reject anything outside your allowed formats, such as JPEG, PNG, or WebP.
- Generate a preview immediately so the user can confirm they picked the right image.
- Open the crop step only after the preview appears. If the image must fit a fixed shape, crop before anything else.
- Compress or resize the cropped result, not the original file.
- Upload the final
BloborFileand clear the original once the upload is done.
That order matters more than teams think. If you compress before cropping, you waste work on pixels the user may throw away. If you open a crop UI before showing any preview, people lose confidence because they cannot tell whether the picker even worked.
A small example makes it clearer. Someone picks a 6 MB phone photo. Your app rejects HEIC if you do not support it, shows a preview in under a second, lets the user crop to a square avatar, and then compresses the cropped image to around 300 KB before upload. The server receives one small final file, and the user sees the result they expected.
That is why image upload flows feel good when they stay simple. Crop when layout matters, compress after that, and send only the final file.
A real example: profile photo upload
Signup forms are where image upload friction shows up fast. Someone drags in a fresh phone photo, and that file is often 6 MB or more. If the app sends it as-is, the form feels slow, mobile users burn data, and the backend has to fix a file that was too large from the start.
A cleaner flow does most of the work in the browser. As soon as the image lands in the form, the app shows a preview and opens a square crop area. On mobile, a square avatar is easier to frame than a free-form crop, and a simple zoom slider often feels more reliable than clever gestures.
The user adjusts the photo once. The app then exports a 512 x 512 version, which is large enough for an avatar on modern screens without being wasteful. After that, compression cuts the file down again. A 6 MB camera image often ends up around 80 KB to 200 KB, depending on detail and format.
That gives the user a clear result before they finish signup. They can see whether their face is centered, whether the crop is too tight, and whether the image still looks sharp. Those quick checks cut down on do-overs later.
On the server side, life gets easier too. Instead of storing one giant original and running resize jobs in the background, the backend receives one ready-to-use file and saves it. You should still validate the upload on the server. Check the file type, confirm the dimensions, and reject anything suspicious. But the heavy lifting is already done, which is usually the right tradeoff for avatars.
Mistakes that break the experience
A lot of image upload flows feel slow because teams create the problem by accident. The UI looks simple, but the order of steps matters. Get the order wrong and even good libraries feel clumsy.
The most common mistake is compressing too early. If a user uploads a 12 MP photo and then crops a small square from the center, early compression spends CPU time on pixels that will never survive the crop. On a laptop that feels wasteful. On an older phone, it can feel broken.
Crop first when the final image is much smaller than the original. Then resize and compress the cropped result. That usually cuts processing time and gives you better visual quality at the same file size.
Another common problem is EXIF rotation. Many phone photos store camera orientation in metadata instead of rotating the pixels themselves. If your preview code ignores that, a portrait photo can show up sideways and the user loses trust immediately. They do not care whether the problem came from the browser, the canvas step, or the library choice. They just see a broken photo.
Quality loss often sneaks in through repeated re-encoding. A file gets turned into JPEG for preview, then JPEG again after crop, then again after compression. Each round can soften edges, add noise, and make faces or text look worse. One clean export near the end is better than several quick ones in the middle.
A simple order works well in most apps:
- Read the file and fix orientation.
- Show the preview.
- Let the user crop if needed.
- Resize to the final display size.
- Compress once before upload.
Performance problems usually come from heavy canvas work on the main thread. Large images can lock scrolling, delay taps, and make the crop box stutter. Older Android phones suffer the most. If your flow handles big photos, limit input dimensions early, avoid huge preview canvases, and move expensive work off the main thread when you can.
A profile photo flow makes this easy to see. If someone picks a 4032 x 3024 image, you do not need to keep every pixel alive through every step. Fix orientation, let them crop a square, resize it to something sensible like 512 x 512, and compress once. That feels faster, uses less memory, and avoids the fuzzy look that comes from processing the same file over and over.
Quick checks and next steps
A photo upload can feel fine on a laptop and still drag on a mid-range phone. Test there first. A 12 MP image that previews instantly on your machine can freeze the UI for a few seconds on a cheaper Android device.
Watch the whole path, not just the happy path. Pick a large photo, crop it, compress it, cancel once, try again, then switch to a bad file and read the error message out loud. If it sounds vague or too technical, users will stop.
A short review catches most problems:
- Check the file size before and after browser processing.
- Compare image quality on a real screen, not a tiny preview.
- Try a slow or flaky connection and make sure retry works.
- Read every error message and strip out technical wording.
- Time the flow from file pick to finished upload on mobile.
You also need a clean line between browser work and server checks. The browser should handle fast tasks that improve the experience, like previews, simple cropping, resizing, and light compression. The server should still verify file type, dimensions, size limits, and anything tied to security or storage rules.
If your team keeps adding packages, stop and trim. Most apps do well with one picker, one cropper if the use case needs it, and one compression tool. More than that often adds bugs, bundle weight, and edge cases that only show up later.
Do not chase perfect compression settings on day one. Start with sane defaults, measure the result, and adjust only if upload time or image quality still feels off.
If you want a second pair of eyes on where browser work should stop and backend validation should begin, Oleg Sotnikov at oleg.is does this kind of product and architecture review as a Fractional CTO. It can help keep the upload flow lean enough for a small team to maintain.
Frequently Asked Questions
What is a good starter stack for React image uploads?
For most React apps, start with react-dropzone for picking files, react-easy-crop for cropping, and browser-image-compression for shrinking the final image. That stack covers the common flow without much setup or extra server work.
Should I crop before I compress the image?
Crop first, then resize and compress. That way you only process the part the user keeps, which saves CPU time and usually gives a cleaner final image.
Are object URLs better than FileReader for previews?
Object URLs are the better default for previews. They are fast, simple, and use less memory for most upload forms. Just remember to call URL.revokeObjectURL when the user replaces the file or leaves the page.
Do I still need server validation if I process images in the browser?
Yes, you still need server checks. Let the browser handle preview, crop, and light compression, but let the server verify file type, size, and dimensions before you store anything.
What size should I export for a profile photo?
A square image around 512 by 512 works well for most avatars. After compression, many profile photos land somewhere around 80 KB to 300 KB and still look sharp on normal screens.
Why do some phone photos show up sideways?
That usually means the image has EXIF orientation data and your flow did not apply it. Fix orientation before you show the preview or open the crop step, or users will think the upload is broken.
Which crop library works best for avatar uploads?
If the upload is mostly for profile photos, react-avatar-editor fits well because it handles drag, zoom, and rotation in one focused tool. If you want a more general cropper with smooth touch controls, try react-easy-crop first.
How many image libraries should I use in one form?
Most teams only need one picker, one cropper if the product needs cropping, and one compression tool. If you keep adding packages for every small edge case, the flow gets heavier and harder to maintain.
Why does image handling feel slow on mobile even before upload starts?
Large photos, heavy canvas work, and too many images in memory usually cause that. Limit image dimensions early, keep previews small, and avoid storing several big versions of the same file in React state.
When should I move image processing off the main thread?
Move expensive image work off the main thread when large files make scrolling, taps, or crop controls stutter. For simple avatar uploads, you often do not need that yet if you crop early and keep output sizes sensible.