Node.js image libraries for uploads, thumbnails, and CMS
Node.js image libraries help teams resize, compress, and transform product photos, avatars, and CMS assets without bloating uploads.
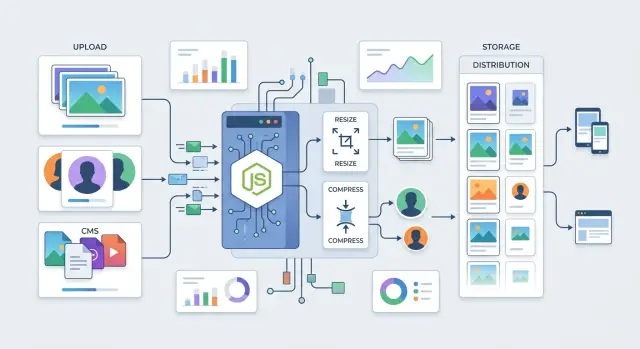
Table of Contents
Why image uploads get messy fast
Most apps receive photos that are far bigger than they need. A phone photo can be 8 MB, 12 MB, or more, even when the app only shows it in a 300 pixel card. If you accept that file as-is, every later step gets heavier: upload time, processing time, storage, and page load.
One image also rarely stays as one image. A store may need a product detail view, a smaller card image, and a zoomable full version. A user avatar usually needs a square crop for profile pages, a tiny version for comments, and sometimes a higher quality one for account settings. A CMS often wants a hero image, a preview image, and the original file for editors.
That means a single upload turns into a small workflow:
- check file type and size
- rotate it if phone metadata says the image is sideways
- crop or resize for each use case
- compress it enough to keep pages fast
If that work happens slowly, people feel it right away. They tap "Save" and the form seems frozen. On weak mobile connections, even a few extra seconds feels broken. If the upload fails after processing starts, users often try again, and now you have duplicate files and confused support tickets.
Bad defaults make the mess spread. Teams often keep the original image, skip thumbnail generation, and promise to fix it later. Later usually means oversized files on every page, random aspect ratios, and blurry images where the app stretched a small source to fit a larger box.
Format mistakes add more trouble. A huge PNG from a design tool can stay huge if nobody converts it. A JPEG saved too aggressively can make faces look smeared. Transparent images can lose their background if the pipeline picks the wrong format. None of these bugs look dramatic in code, but users notice them fast.
This is why comparing Node.js image libraries is only part of the job. The hard part starts earlier: deciding what versions you need, how fast uploads should feel, and what quality rules your app will enforce every time.
What your image stack needs to do
An image pipeline should take messy real-world uploads and turn them into files your app can use every time. Users upload huge phone photos, tiny logos, transparent PNGs, and odd crops. If your stack does not normalize them, the front end pays for it with slow pages and awkward layouts.
Start with a small set of fixed sizes. Most products only need a few dependable outputs, not endless resize options. A product image might need a thumbnail, a card size, and one larger version. An avatar often needs just one square size. A CMS image may need two or three breakpoints for different page areas.
Compression is the next job. Storage is cheap until you keep full-size uploads forever and send them unchanged to every device. Good image compression in Node.js should cut file size hard enough to help load time, but not so hard that skin tones look waxy or text in screenshots turns fuzzy. Different images need different settings. Avatars can take more compression than a homepage banner.
Random aspect ratios also need control. Some images should fill the frame, so cropping makes sense. Others should stay fully visible, so padding works better. Product photos often look best with a consistent crop. Logos and editorial graphics usually need padding so nothing gets chopped off.
Your stack should also handle format changes without drama:
- Convert large JPEG or PNG uploads into web-friendly formats for delivery
- Keep transparency when the image needs it
- Save lighter versions for thumbnails and cards
- Avoid format changes that make text or line art look worse
One more rule matters more than teams expect: keep the original file when editors may need to reframe, re-export, or fix a bad crop later. Derived files are for delivery. The original is your safety net.
That is what most teams mean when they talk about Node.js image libraries. They do not just want resizing. They want predictable outputs for products, avatars, and CMS content, with enough flexibility to fix edge cases without rebuilding the whole pipeline.
Which Node.js libraries people actually use
Most teams end up choosing from a short list. The market looks bigger than it is, but in real apps, a few tools keep showing up because they solve common upload problems without too much drama.
Sharp is the default pick for busy APIs. It handles resize, crop, rotate, format conversion, and thumbnail generation fast enough for product photos, user avatars, and CMS uploads. If your server needs to process lots of images per minute, Sharp usually feels like the practical choice.
Jimp still has a place. It is easier to approach when you want simple edits in pure JavaScript and would rather avoid native build issues. That trade-off is real, though. Jimp is slower, and the gap gets obvious once image sizes grow or traffic picks up.
Older systems often stick with ImageMagick or GraphicsMagick through Node wrappers. That setup can handle a wide mix of file types and unusual transforms, which is why it survives in long-running CMS and media systems. The downside is setup and maintenance. You get power, but you also get more moving parts.
Squoosh-based tools show up when teams care a lot about output tuning. They are useful for squeezing web images harder, especially when people want to tune WebP or AVIF settings instead of taking default compression. That matters more in batch jobs and publishing pipelines than in a hot request path.
A rough match looks like this:
- Sharp for high-volume uploads and fast thumbnail generation
- Jimp for small apps or simple edits with fewer native dependencies
- ImageMagick or GraphicsMagick for older stacks and odd file formats
- Squoosh-based tools for careful format tuning and offline compression work
If you compare Node.js image libraries in real projects, speed is only part of the story. Deployment pain, memory use, and image quality matter just as much. A small store with 50 uploads a day can live with a slower tool. A marketplace that processes thousands of product images cannot.
That is why Sharp vs Jimp is not really a philosophical debate. It is usually a traffic question. Then it becomes an operations question.
Match the stack to the job
Most Node.js image libraries look similar until traffic hits, file sizes grow, and editors start uploading every shape you can imagine. The right stack depends less on image effects and more on the kind of mess you need to handle every day.
For product uploads, consistency matters more than fancy editing. Store pages usually need a grid image, a detail view, and a search thumbnail. Sharp is the safe default here because it resizes fast, compresses well, and can produce several versions from one upload without eating too much memory. If you run on a lean cloud budget, that difference shows up fast.
Avatars are a different job. You want a square image, a small file, and a crop that does not chop off someone’s forehead. Sharp still fits best for resize, crop, and metadata cleanup, but face-safe results often need one extra step. Pair it with a face detection service or model, then let Sharp do the final crop and padding. Jimp can work for a low-traffic app, but it usually feels slow once uploads stop being occasional.
CMS pipelines need flexibility. Editors upload tall portraits, wide banners, screenshots, and photos from phones. A rigid set of rules breaks quickly. In this case, use Sharp with preset rules in code: one preset for hero images, one for inline article media, one for social previews, and one for tiny thumbnails. That gives you control without asking editors to fix every file by hand.
When hundreds of images arrive at once, the image library is only part of the stack. You also need workers, a queue, and retries.
- Product catalogs: Sharp + stored original + 3 to 5 fixed output sizes
- Avatars: Sharp + face detection + strict max dimensions and file size limits
- CMS uploads: Sharp + preset-based transforms + format rules per image type
- Bulk imports: Sharp workers + queue system + retry logic and rate limits
A simple example makes the split clear. An online store might receive 800 supplier photos overnight, while users upload profile photos all day and editors add blog images whenever they publish. One code path for all three sounds tidy, but it usually creates bad crops, wasted CPU time, and messy file storage.
Use the same core library when you can, but do not force one workflow on every image. Sharp handles most production work well. Bring in Jimp only for small custom edits or internal tools where speed does not matter much. The job should decide the stack, not the other way around.
How to choose a stack step by step
Start with the outputs, not the library names. Write down every image your app needs to create: product thumbnails, retina product shots, small avatar crops, full-size CMS images, WebP versions, maybe a blurred preview. If you skip this step, every tool can look good on paper.
Then decide what you store and what you serve. Those are often different. You might store the original upload plus one cleaned master file, then serve WebP or AVIF to browsers and JPEG or PNG when you need a fallback. That choice affects disk use, processing time, and how much work your Node.js image libraries need to do on every upload.
Use real files when you test. Demo images hide problems. A better test set includes a few phone photos, a screenshot with sharp text, a transparent PNG logo, and a design export from Figma or Photoshop. Those files fail in different ways. Phone photos are large, screenshots look bad when over-compressed, and design exports often carry odd color profiles or huge dimensions.
Measure the same things for each option:
- processing time per image
- memory use during resize and format conversion
- output file size
- visible quality at normal viewing size
- how much custom code you need to maintain
A small test tells you more than a feature list. For example, if your app handles user avatars and product uploads, fast resize speed may matter more than support for dozens of effects. If your CMS team uploads banners and marketing assets every day, image quality and format handling matter more.
"Sharp vs Jimp" often comes down to workload. Sharp usually wins when speed and lower memory use matter. Jimp can feel simpler for small jobs, but it tends to struggle sooner under load. That does not mean you need the most advanced stack. It means you should pick the simplest setup that handles your current traffic, your real image types, and a bit of growth.
If one library covers resize, crop, compression, and format conversion well, stop there. A smaller stack breaks less often.
A simple comparison by workload
Among Node.js image libraries, the better choice usually comes from workload, not from feature lists. A small admin panel and a busy product catalog do not need the same tool.
Sharp fits product catalogs, marketplaces, and any app that handles a lot of uploads. It is fast, it keeps memory use under control, and it does a good job with resize and image compression in Node.js. If a store imports 5,000 product photos and needs small, medium, and zoom versions, Sharp is the practical option.
Jimp works better for lighter jobs. If an admin uploads a team photo, crops it, adds a simple label, and saves it once, Jimp can be enough. Its code often feels easier to follow. I would still avoid it for heavy traffic, because basic convenience does not make up for slower processing when volume grows.
Older CMS setups often sit in a different bucket. If the team already uses ImageMagick scripts through shell commands, a Node wrapper can be the least risky path. You keep the same output, the same naming rules, and the same odd cases that editors already know. Rewriting all of that into a new stack can cost more than it saves.
- High volume product uploads: Sharp
- Light admin edits and low traffic: Jimp
- Legacy CMS with existing shell scripts: ImageMagick wrapper
- Many thumbnail generation jobs in the background: Sharp plus a queue
The queue matters more than people expect. If your app creates six thumbnails after every upload, do not make the user wait while the request does all the work. Save the original image, return a quick response, and let a worker process the rest. That keeps the app snappy and avoids timeout issues.
A simple example makes the split clear. A fashion store with thousands of SKU images should use Sharp. A small internal HR tool that stores profile photos can get by with Jimp. A publisher with an old CMS and years of ImageMagick scripts should probably keep those scripts and wrap them cleanly.
Sharp vs Jimp is not really a style choice. It is a traffic and workload choice.
A realistic example with products, avatars, and CMS
A small shop usually gets images from two very different sources. One seller uploads a phone photo with odd lighting and a huge file size. Another uploads a clean studio shot with a white background. Your backend should treat both as normal input, not as special cases that need manual fixes.
A practical setup is simple: accept the upload, validate type and size, store the original, then generate a few presets with the same rules every time. For most teams, one of the common Node.js image libraries plus Sharp is enough for this job because it handles resize, crop, format conversion, and image compression in Node.js without much fuss.
For product photos, presets do most of the work:
- a square thumbnail for search results and category pages
- a card image for product grids
- a larger zoom image for the product page
- a small avatar preset for author photos
- a wide banner preset for blog covers
That sounds like five different problems, but it is really one CMS image pipeline with clear output sizes.
The product flow might look like this: a merchant uploads a 3024x4032 phone photo, and the server creates a 400x400 thumbnail, an 800x1000 card image, and a 1600px zoom version. If a studio image comes in at 2400x2400, the same presets still apply. The code does not need to guess what the image is for. It only needs to know which preset to run.
The blog side works the same way. An editor uploads an author photo that is too tall, plus a banner that is too small or oddly cropped. The server can crop the author photo to a square and resize the banner to a fixed width while keeping it sharp enough for desktop screens. The editor sees a predictable result instead of tweaking images by hand.
The trap is naming presets loosely, like "small" or "large." That gets messy fast. Names such as "product_thumb," "product_zoom," "author_avatar," and "article_banner" are boring, but they save time. When presets are clear, one stack can handle product uploads, avatars, and article media without turning image handling into a weekly cleanup job.
Mistakes that break image pipelines
A lot of image bugs start with one bad habit: doing the full resize and compression step every time someone opens a page. That works in testing, then traffic grows and your CPU stays busy making the same thumbnail again and again. Generate the result once, store it, and reuse it.
Another common mistake is keeping one huge original and expecting the browser to fix the rest. Browsers can scale an image down for display, but they do not make a 5000 pixel product photo cheap to download. If your store page shows small cards, your users need small files made for those cards.
EXIF rotation trips up more teams than it should. A phone photo may look upright on the device, then appear sideways after upload if your pipeline ignores metadata. Product shots look sloppy when this happens. User avatars look even worse because people notice faces first.
Compression mistakes are more subtle. Teams often push the same settings across every image type, and that hurts avatars fast. Strong compression might be fine for a large banner with soft backgrounds. On a small profile photo, it turns skin and hair into a muddy blur.
Size limits matter too. If you let people upload anything, someone will send a 60 MB photo straight from a modern phone, or a giant PNG from a design tool. One file like that is annoying. A batch of them can clog your queue, slow workers, and back up the rest of the CMS image pipeline.
A safer setup usually looks like this:
- keep the original upload for backup or reprocessing
- fix rotation before any resize step
- create a small set of cached sizes for real page layouts
- use different compression rules for products, avatars, and content images
- reject files that exceed your size and dimension limits
If your backend already handles uploads, add these checks early. They save money, reduce support headaches, and stop slow image code from spreading into the rest of the app.
Quick checks before you ship
Most image bugs start before processing, not after. If you let users send huge files and only reject them at the end, you waste bandwidth, CPU time, and patience.
Set limits at the upload gate. Reject oversized files as early as possible, and show the limit in plain language so people know what went wrong. A message like "Max file size is 10 MB" works better than a vague upload error.
Pick exact output sizes for each place an image appears. Do not rely on "small," "medium," and "large." A product card might need 400 x 400, a profile avatar 128 x 128, and a CMS hero 1600 x 900. Fixed targets keep your thumbnail generation predictable and stop layout shifts later.
File format edge cases need real tests. Transparent PNG files often look fine until someone converts them to JPG and gets a black or ugly background. JPG uploads bring a different problem: they have no transparency, so logos and cutout images can look broken if your pipeline assumes they do.
A quick staging pass should include a small set of awkward files:
- a very tall portrait photo
- a wide landscape banner
- a square product shot
- a transparent PNG logo
- an odd crop like 1231 x 777
That mix catches most aspect ratio problems fast. You will see whether your crop rules cut off faces, whether padding looks awkward, and whether one screen slot ends up softer than the rest.
Then check failure paths like a normal user would. If processing times out, if the format is unsupported, or if disk space runs low, what does the person actually see? "Upload failed" is not enough. Tell them whether they should retry, shrink the file, or choose another format.
Even the best Node.js image libraries cannot save a fuzzy CMS image pipeline if these rules are missing. Run ten real files through staging, compare every output size, and read every error message with fresh eyes.
Next steps if this touches your whole backend
Image handling stops being a small feature once it changes storage, queues, cache rules, and cloud spend. When that happens, treat it like backend architecture. A messy image path can leak into every part of the app.
Start small on purpose. Pick one upload path and one preset list, then make that flow boring and predictable before you add more cases. For example, product photos might get large, medium, and thumbnail sizes, while avatars get one square crop and one backup original.
A short written plan helps more than another library test. Keep it plain:
- define one upload entry point
- name the presets you will support
- decide where originals live
- decide where transformed files live
- decide where failed jobs go and how you retry them
That last point matters. If a transform fails, your team needs to know whether you keep the original, mark the record as failed, or try again later. If nobody writes that down, the CMS image pipeline turns into guesswork.
Use real files from your app when you test. Stock photos are too clean. Try a huge product image from a phone, a transparent PNG avatar, an editor-uploaded banner with odd dimensions, and one file that should fail. Those files expose slow paths, memory spikes, naming problems, and format bugs fast.
Watch costs early. Thumbnail generation looks cheap until every upload creates five derivatives, stores them forever, and pushes extra queue work during traffic spikes. A simple plan usually beats a clever one.
If this work now touches storage layout, job queues, retry logic, and monthly infrastructure spend, an outside review can help. Oleg Sotnikov does this kind of architecture work as a Fractional CTO, with a strong focus on lean AI-first engineering and low-cost production setups. That sort of review makes sense when your image system has started to shape the whole backend, not just the upload form.