Docker image slimming for faster deploys that you feel
Docker image slimming can cut pull time and speed up releases when you fix layer order, remove build waste, and choose a base image wisely.
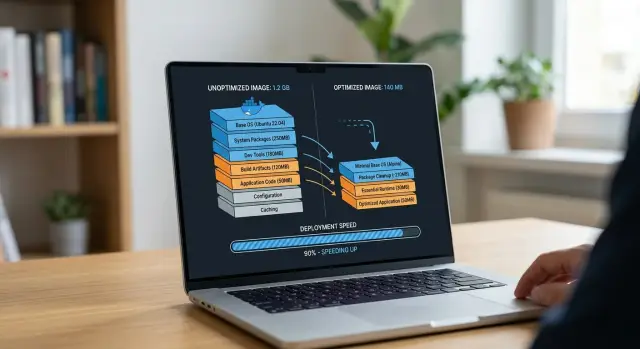
Table of Contents
Why smaller images do not always speed up deploys
A 200 MB image can still feel slow if your team waits on the wrong part of the release.
A deploy usually moves through four steps: build the image, push changed layers to the registry, pull missing layers onto the server, then start the container and wait for health checks to pass. Image size affects only part of that chain. If the registry, server, or cluster already has most layers cached, pull time may be short. In that case, cutting a few hundred megabytes can look good on paper and barely change the release clock.
Layer layout often matters more than the final size. One poorly placed layer can wreck cache reuse. A common mistake is putting dependency install and app source in the same step. Then a tiny code change forces Docker to rebuild, push, and pull that whole layer again. The image may still look slim, but every release stays slow.
Compression can hide the real cost too. An image might shrink on disk and still take time to unpack, verify, and start. Some teams chase megabytes and ignore the startup path. If the app spends 40 seconds warming up, a smaller image alone will not save the deploy.
A simple example makes the point. Say you run a small API. You cut the image from 450 MB to 260 MB, but every deploy still rebuilds the dependency layer and the app still needs 30 seconds before it answers health checks. The release feels almost the same.
What matters is wait time, not just image size. Measure how long the build takes, how much data you actually push and pull, and how fast the container becomes ready. If those numbers drop, your team will notice.
What actually slows a deploy
Most slow deploys come from the same four places: build, push, pull, and startup. Teams often blame image size for all of them, but that is too simple. Size mostly affects push and pull time. Build time and startup delays usually come from other causes.
If your CI job spends 6 minutes building and only 40 seconds pushing to the registry, shrinking the image by 200 MB will not change much. If the build finishes in 50 seconds but each server spends 2 minutes pulling layers over a slow link, then size matters a lot. Time each step before you start removing packages.
A quick check usually tells the story:
- how long the build takes in CI
- how long the push to the registry takes
- how long each server spends pulling layers
- how long the container takes to become healthy
Cache changes the picture on repeat deploys. Docker does not transfer every byte on every release if the old layers already exist in the registry or on the server. A 900 MB image can deploy surprisingly fast when only a small app layer changed. The opposite happens too. A 250 MB image can still feel slow if bad layer order forces Docker to rebuild and re-push dependency layers on every commit.
Startup time is its own problem. A smaller image does not guarantee a faster boot. Containers often start slowly because the app runs migrations, warms caches, downloads models, or waits for a database. A static Go service in a larger image may come up in a second. A tiny Node or Python image can still take much longer if startup work is heavy.
Network limits matter more than many teams expect. CI runners, the registry, and production servers often live in different regions or even different providers. Every deploy crosses the network twice: once on push, once on pull. If one link tops out at 20 to 50 Mbps, slimming the image has a visible effect. In many setups, keeping runners, registries, and servers closer together saves as much time as trimming the image itself.
Choose a base image that fits the app
The smallest base image is not always the best one. If your app needs extra libraries, certificates, shell tools, or build helpers, a tiny base can grow quickly and still leave you with slower, more annoying deploys.
A better rule is simple: pick the base that needs the fewest extra parts for your real app. That usually beats chasing the smallest number in a dashboard.
Alpine is tiny and often works well for static Go or Rust binaries. It fits nicely when you copy in one compiled binary and run it.
But Alpine uses musl instead of glibc. That can cause trouble with Python wheels, Node native modules, some Java setups, and tools that quietly expect a more common Linux environment. Teams then pile on extra packages to make things work, and the image stops being small in any practical way.
Debian slim is larger, but it is a safer default for many apps. If you run Node, Python, Java, or anything with native dependencies, Debian slim often saves time because packages behave the way you expect and debugging is easier.
Distroless images can be excellent for production runtime containers. They remove the shell, package manager, and many extra files, which cuts size and removes clutter. The downside is obvious when something breaks. You cannot just open a shell and inspect the container. That trade-off works well for mature services with clean logs and good monitoring. It can slow down a small team that still needs to poke around.
Full images still have a place. They make sense in build stages or for apps with awkward dependency chains. They are rarely the best final runtime image, but they often make builds simpler and more reliable.
A quick rule of thumb helps:
- Use Alpine for simple static binaries and tightly controlled setups.
- Use Debian slim for most general app stacks.
- Use distroless for stable runtime images when you already debug outside the container.
- Use full images for build stages or messy dependencies.
In practice, fewer installed packages matter more than a fashionable tiny base. A Node app on Debian slim with only what it needs will often deploy better than an Alpine image stuffed with fixes, compilers, and debug tools.
Put layers in the right order
Layer order decides whether Docker reuses work or throws it away. If you copy your whole project too early, one small code change can force Docker to reinstall packages, rebuild assets, and push large layers again.
Start with the parts that barely change. System packages, runtime tools, and user setup belong near the top of the Dockerfile because they stay stable for long stretches. Put app code later. Source files change every day, sometimes every hour. When they sit near the end, Docker rebuilds only the last steps instead of starting over.
For most apps, a simple order works well: start from the base image, install only the system packages you need, copy package manifests and lockfiles, install app dependencies, then copy the rest of the source code.
That lockfile step matters more than many teams expect. Files like package.json, package-lock.json, poetry.lock, requirements.txt, go.mod, or Cargo.lock tell Docker when dependencies changed.
If the lockfile stays the same, Docker can reuse the dependency layer even when you edit ten source files. That saves time during local builds, CI runs, and registry pushes. Smaller deploys feel faster because unchanged layers do not move again.
A Node app often slows itself down with this pattern:
COPY . .
RUN npm install
A better pattern is:
COPY package.json package-lock.json ./
RUN npm ci
COPY . .
Now a CSS fix or a small API change does not trigger a full dependency install. The same idea works for Python, Go, Rust, and Java projects.
This is where image slimming starts to pay off in a way you can feel. Smaller dependency layers help, but the bigger win comes from not rebuilding or re-uploading them at all. If a tiny code edit changes only one small top layer, deploy time often drops more than teams expect.
Clean up packages and build leftovers
Most size wins come from boring cleanup work. A few stray caches, temp folders, and build tools can add hundreds of megabytes, and they stay there if you remove them the wrong way.
Layer behavior matters here. If one step installs packages and a later step deletes the cache, the old layer still keeps the extra files. To shrink the image, install and clean up in the same RUN command.
A common case is apt. The package index helps during install, but your app does not need it at runtime. If you leave it behind, every deploy moves extra data for no reason.
RUN apt-get update && apt-get install -y build-essential curl \
  && rm -rf /var/lib/apt/lists/*
Build tools are another quiet source of bloat. Compilers, headers, and package managers often belong only in the build step. Your production container usually needs the final binary, compiled assets, or installed app files. It does not need gcc, make, or a full toolchain.
Temp files cause the same problem. Archive files, extracted source folders, test artifacts, and installer leftovers often stay in the image because nobody removes them before the layer finishes. Once they land in a layer, they keep taking space even if you delete them later.
A good cleanup pass usually means removing package manager caches in the same layer as install, deleting downloaded archives after you unpack them, keeping build tools out of the final image, and copying only runtime files into production.
Multi-stage builds solve much of this at once. You build the app in one stage with all the heavy tools, then copy only the result into a smaller runtime stage. That keeps the final image focused on what the container actually runs.
Think of a Node app that installs Python, make, and g++ to compile native modules. Those tools help during npm install, but they do nothing in production after the app starts. A multi-stage build lets you keep the compiled app and drop the rest.
It is not glamorous work, but it often produces faster deploys you can feel right away, especially when the same image goes through CI, registry push, pull, and rollout on every release.
Slim the image step by step
Start with numbers, not edits. Check the current image size, then time how long the image takes to pull through the same registry, region, and network path your deploy uses. Guessing wastes time. Sometimes a big size drop changes almost nothing because the real delay sits elsewhere.
Then write down what the app needs after it starts. Most images carry extra baggage from the build process. Your runtime usually needs the built app, binary, or static files, the libraries it loads, certificates and config, plus the user, ports, and working directory.
It usually does not need compilers, test tools, cache folders, package indexes, or source files that never run in production. Skip this runtime list and slimming turns into trial and error.
Next, rebuild the Dockerfile with multi-stage steps. Use one stage to install build dependencies and compile the app. Use the final stage only for runtime files. Copy the smallest set of outputs that still lets the app start cleanly. A Node app might copy the built server and production modules. A Go app might copy one binary and certificates.
Clean as you go. Remove package manager caches in the same layer where you install packages, or the bytes stay in the image history. The same rule applies to temporary archives, build folders, and downloaded installers.
After that, test the new image in the same deploy path you use for real releases. Run the same pull, start, health check, and rollback steps. A smaller image that breaks logs, shell access, or SSL trust is not an improvement. You want a faster deploy that behaves the same under load.
Keep the version that cuts pull time without making maintenance harder. If a tiny image saves two seconds but makes debugging painful, skip it. If a cleaner multi-stage build drops hundreds of megabytes and deploys faster every time, keep it and document why it works.
A simple before and after example
A small Node app shows the problem quickly. The app itself is not huge, but the image gets bloated because the build starts from a full base image and copies everything too early.
In the first version, even a one-line change in src/index.js breaks the cache for dependency install. Docker has to run npm install again, build again, and push or pull more data than needed.
FROM node:20
WORKDIR /app
COPY . .
RUN npm install
RUN npm run build
CMD ["node", "dist/index.js"]
That order looks harmless, but it is expensive. COPY . . brings in the whole project at once. When any source file changes, Docker treats the next layers as new, so the package install layer gets rebuilt too.
A better version copies only the dependency files first, installs packages once, then copies the app code. It also uses a separate runtime stage with a slimmer base image.
FROM node:20 AS build
WORKDIR /app
COPY package.json package-lock.json ./
RUN npm ci
COPY src ./src
COPY tsconfig.json ./
RUN npm run build

FROM node:20-slim
WORKDIR /app
COPY --from=build /app/node_modules ./node_modules
COPY --from=build /app/dist ./dist
CMD ["node", "dist/index.js"]
Now the cache works the way you want. If you only change app code, Docker keeps the npm ci layer. The rebuild is shorter, and the final image is smaller because the runtime stage drops build tools and other leftovers from the full base.
The numbers are usually easy to feel. A common before image might land around 1.1 GB and take about 30 to 40 seconds to pull on a fresh server. After reordering layers and switching the final stage to node:20-slim, the same app might drop to 220 MB and pull in 6 to 9 seconds.
That is why size cuts matter most when you pair them with better cache behavior. A smaller image helps. A smaller image that does not reinstall dependencies on every change helps a lot more.
Mistakes that cancel out the gains
A smaller image can still deploy at the same speed if you trim the wrong parts. If the cache breaks often, or the final image still carries tools it does not need, the saved megabytes may not change much.
One common mistake is keeping debug tools in the final image. Shell helpers, package managers, compilers, and network tools feel useful during testing, but production containers rarely need them. They add size, create more exposure, and turn the image into a general-purpose box instead of a runtime package.
Cleanup often goes wrong in a subtle way. Teams install packages in one layer, then remove caches in a later layer and assume the image is clean. Docker keeps those earlier bytes in layer history. If you install and clean in the same RUN command, or move build steps into a separate stage, the final image really gets smaller.
Base image churn causes another problem. When you use latest, or switch base images too often, Docker has to pull and rebuild more than necessary. Deploys also become less predictable. A pinned base image gives you steadier caching and fewer surprises.
Some teams chase the absolute smallest image and end up with a system that is harder than it needs to be. Saving another 20 MB is not worth it if the Dockerfile becomes fragile, hard to read, and slow to maintain. A simple image that deploys fast every day beats a tiny image that breaks during routine updates.
The worst cuts happen when someone removes files the app still needs at runtime. That might be CA certificates, shared libraries, timezone data, or a small binary used by the entrypoint. The image looks lean right up until the container starts failing in production.
A short sanity check helps:
- keep only runtime tools in the final image
- install and clean up in the same layer
- pin base image versions
- test the container after every trim
- stop trimming when deploy time stops improving
If a change saves space but adds risk, skip it. Fast deploys come from fewer bytes and fewer surprises.
Quick checks and next steps
Measure three numbers together: image size, pull time, and rebuild time. If you watch size alone, you can miss the real problem. Faster deploys usually come from a mix of smaller pulls, better cache reuse, and less rebuild work.
A simple scorecard helps:
- final image size
- pull time on a fresh machine
- rebuild time after a small code edit
- cold start time for the container
Run the container the way you run it in production. Make sure the app starts with runtime dependencies only. If the final image still carries compilers, package managers, or build tools that the app never uses at runtime, you left easy wins on the table.
Do one more practical check before shipping. Read the logs, test the health check, and confirm you can still debug the container in the way your team expects. Some teams remove shell access and save space, then get stuck during an incident because nobody can inspect the running container. That can still be the right choice, but decide it on purpose.
Write down the Docker layer order in the repo. Keep it short and plain: copy lockfiles first, install dependencies early, copy app code later, and clean package caches in the same step where you install them. If nobody writes this down, the Dockerfile usually gets messy again after a few rushed edits.
Treat this as regular maintenance, not a one-time cleanup. Check the image every few releases. If deploy time starts creeping up again, look for a new package, a cache-busting COPY step, or a base image that no longer fits the app.
If you want a practical review of the Dockerfile and the wider delivery flow, Oleg Sotnikov at oleg.is works with teams as a Fractional CTO and startup advisor. A second look often spots the one layer, network hop, or build habit that keeps releases slower than they should be.